Overview
WhiteSource Issue Tracker enables you to create an issue in a ticketing system according to a policy you defined in the WhiteSource application. Currently, WhiteSource supports integrations with Jira Cloud, Jira Server (starting v 8.5.4) and Work Items.
NOTE: WhiteSource has created a new ability to integrate with issue tracking systems; refer here for details.
Jira Integration
Entering Your Jira Credentials
In WhiteSource, click Admin to go to Organization Administration.
In Integration, click Issue Tracker Settings.
Enter your Jira credentials. Ensure that the URL points to a valid Jira server, and that user name and password are valid user credentials.

Click Save. WhiteSource verifies the combination of URL+ username + password/API token.
Creating a Policy with an Issue Action
From the menu bar, select Policies > Add Policy.
Fill in Name and select a Match.
In Action, select Issue.
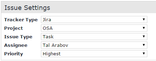
In Issue Settings, enter the required fields:
Click Save.
Reviewing the Newly-Created Issue
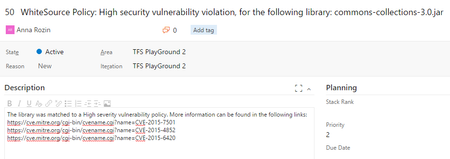
After scanning a project matching the policy you created in the above steps, go to your Jira account. The new issue will be displayed.
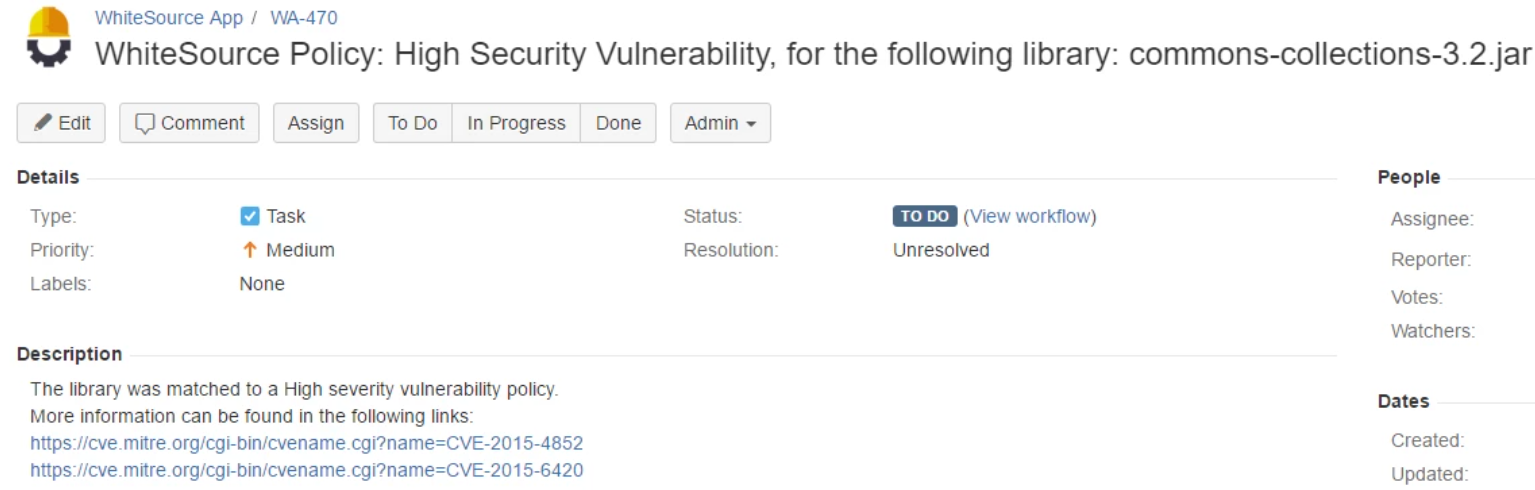
The CVE links are displayed only if there are applicable CVE records that have been verified by the NVD.
Work Items Integration
Entering Your Work Items Credentials
Using Personal Access Tokens (RECOMMENDED)
Go to your Azure DevOps account.
Click the profile button and select Security.
Click Personal Access Tokens.
Click New Token.
In Create a New Personal Access Token, do as follows:
In Name, enter WhiteSource Integration.
In Organization, select your organization.
In Expiration, select your preferred expiration date.
In Scopes, select Full access.
Click Create.
In the Success screen, copy the personal access token (for use later in this procedure).
Click Close.
In WhiteSource, click Admin to go to Organization Administration.
In Integration, click Issue Tracker Settings.
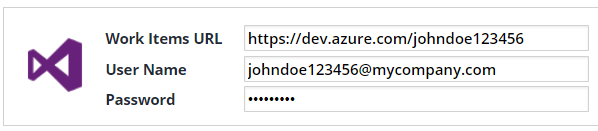
Enter your Work Items URL and User Name. In Password, enter (paste) the token that you created previously in this procedure.
Click Save.
Using Alternate Credentials
Go to your Azure DevOps account.
Click the profile button and select Security.
Click Alternate credentials.
Select the Enable alternate authentication credentials checkbox and create a password.
Click Save.
In WhiteSource, click Admin to go to Organization Administration.
In Integration, click Issue Tracker Settings.
Enter your Work Items URL and User Name and enter the password that was created in the above steps.
Click Save.
Creating a Policy with an Issue Action
From the menu bar, select Policies > Add Policy.
Fill in Name and select a Match.
In Action, select Issue.
In Issue Settings, enter the required fields.
Click Save.
Reviewing the Newly-Created Issue
After scanning a project matching the policy you created in the above steps, go to your Azure DevOps account. The new issue will be displayed.